In this article:
- Overview
- Creating a Global Lookup Table
- Using a Global Lookup Table in the Custom Mapping Tool
- Using a Global Lookup Table in Custom Processors
Overview
Global Lookup tables allow for standardization and scalability. They are helpful in cases where you have many data points across multiple Integrations each requiring a one-to-one conversion to a new value. You can reference Global Lookup tables across all Integrations rather than developing individual Lookup tables for each Flow or Integration. Data conversion references can easily be updated in one place instead of needing to update them individually for each Flow or Integration.
Lookup tables are only available in the mapping in which they were created. By comparison, the global component of Global Lookup tables expands the Lookup table functionality by making the tables available for use in multiple areas of the Chain.io platform. Global Lookup tables are accessible in all of your custom mappings, custom processors, and XSL transformations.
You can create a Global Lookup table using any of the following methods:
Uploading a CSV file
Manually entering data into the Global Lookup table
For convenience and synchronization with your internal business data and processes, you can utilize the Chain.io GraphQL API to add, update, or publish new versions of Global Lookup tables through your own systems.
For more information about the GraphQL API, refer to the following support articles:
Global Lookup table data conversions can be useful for translating branch codes, port codes, tariff codes, customs codes, and customer data. Another example is mapping UN/LOCODEs to city, state, country, etc. Since Global Lookup tables exist at the Workspace level, you can reference the table in any Flow or Integration for easier data translations.
For more examples of using Global Lookup tables, refer to the Guide to JSONata Mapping Expressions support article.
Example
A freight forwarder uses internal codes for designating ports, customers, and branches. They do business with two ocean carriers. Carrier A uses UN/COCODEs, and Carrier B uses a different set of port codes and numeric customer codes in EDI 315 messages.
Shipment Details
Port: Los Angeles (PORT_LAX)
Branch: Singapore Office (BR_SING)
Customer: ShoesPlus (CUST_00123)
Code Conversion
|
Freight Forwarder Internal Code |
Carrier A Format (Freight Forwarder) |
Carrier B Format (Ocean Forwarder) |
| PORT_LAX | USLAX | LAXPORT |
| BR_SING | SGSIN | SG01 |
| CUST_00123 | ADIDAS_NA | 00234 |
To send an event file to output as an EDI 315, which includes shipment status details, the freight forwarder can transform the original internal codes into carrier-supported formats by using a Global Lookup table in a custom mapping or in a custom processor.
To create a Global Lookup table the freight forwarder can:
Upload a previously created CSV file containing the value conversions, or
Insert the values into the Global Lookup table manually
To complete the data translation using the Custom Mapping Tool method, the freight forwarder can:
Reference the Global Lookup table in the JSONata expression of the the Custom Mapping Tool and select EDI 315 as the target mapping output file type
Employ the mapping in a Flow and execute the Flow.
To complete the data translation, using the custom processor method, the freight forwarder can:
Reference the Global Lookup tables in a pre-processor.
Execute the Flow.
Creating a Global Lookup Table
You can create a Global Lookup table using any of the following methods:
- Uploading a CSV file
- Manually entering data into the Global Lookup table
- Referencing an existing Lookup table created within the Custom Mapping Tool
Follow the steps below to create a Global Lookup table:
- At the top menu bar, click Workspace and select the desired Workspace.
- At the top right of the window, click Workspace Settings from the hamburger menu.
-
Scroll down to the Developer Center subsection.
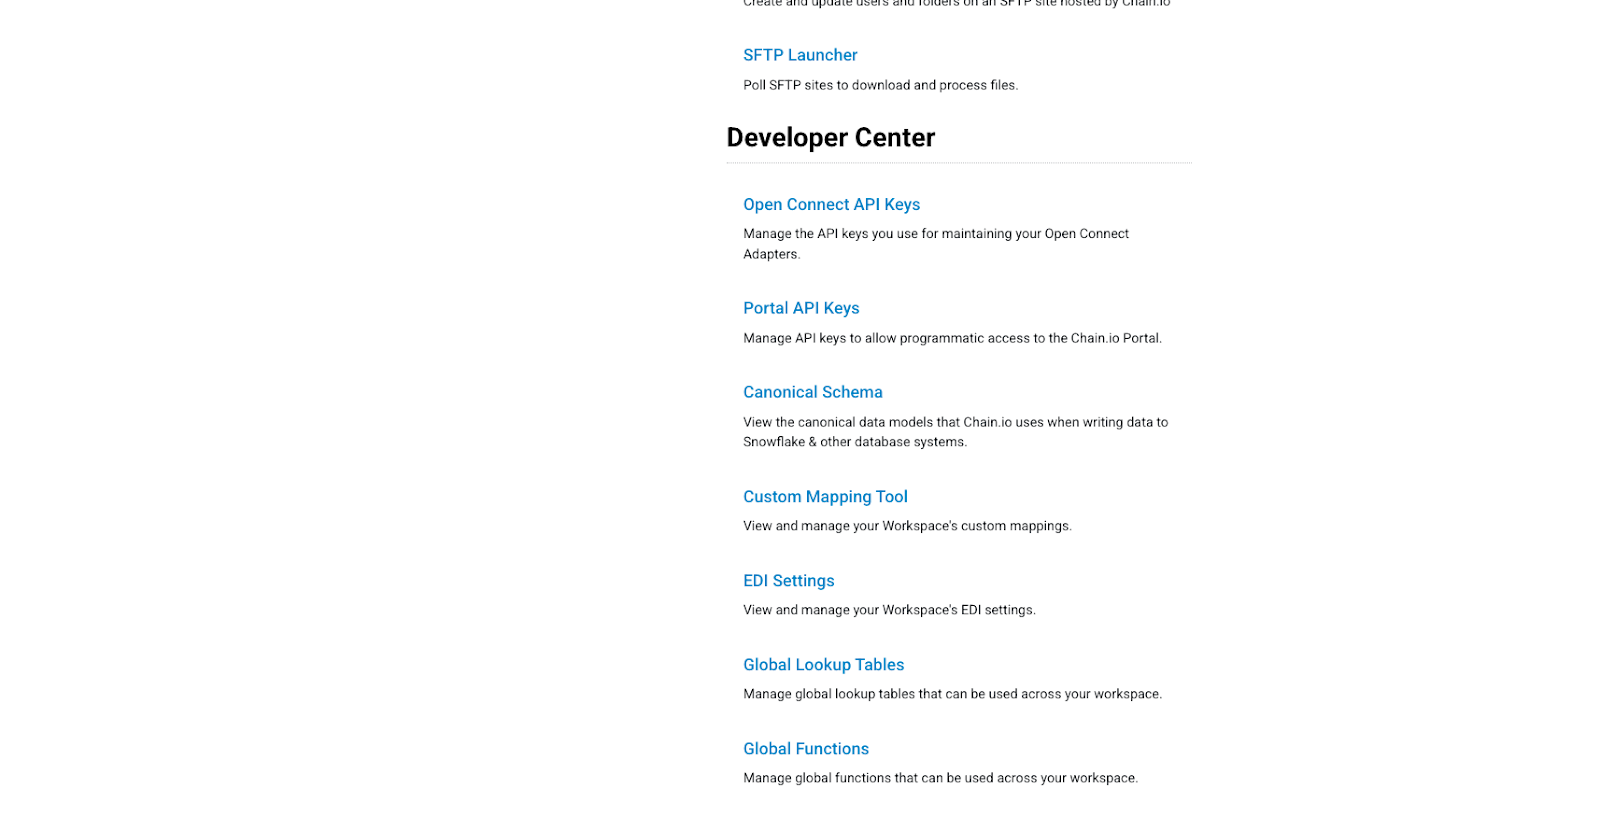
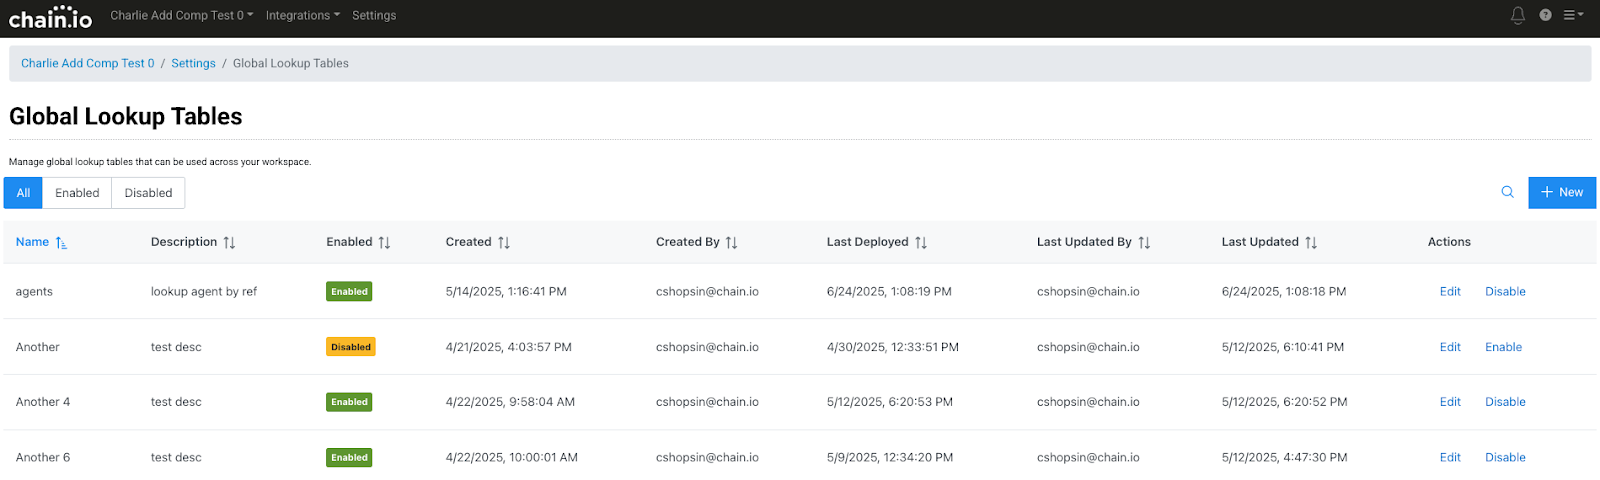
- Click Global Lookup Tables.
If you have previously created Global Lookup tables, they will appear in the table. In the upper left region of the table, you can select to display all, enabled, or disabled Global Lookup tables.
-
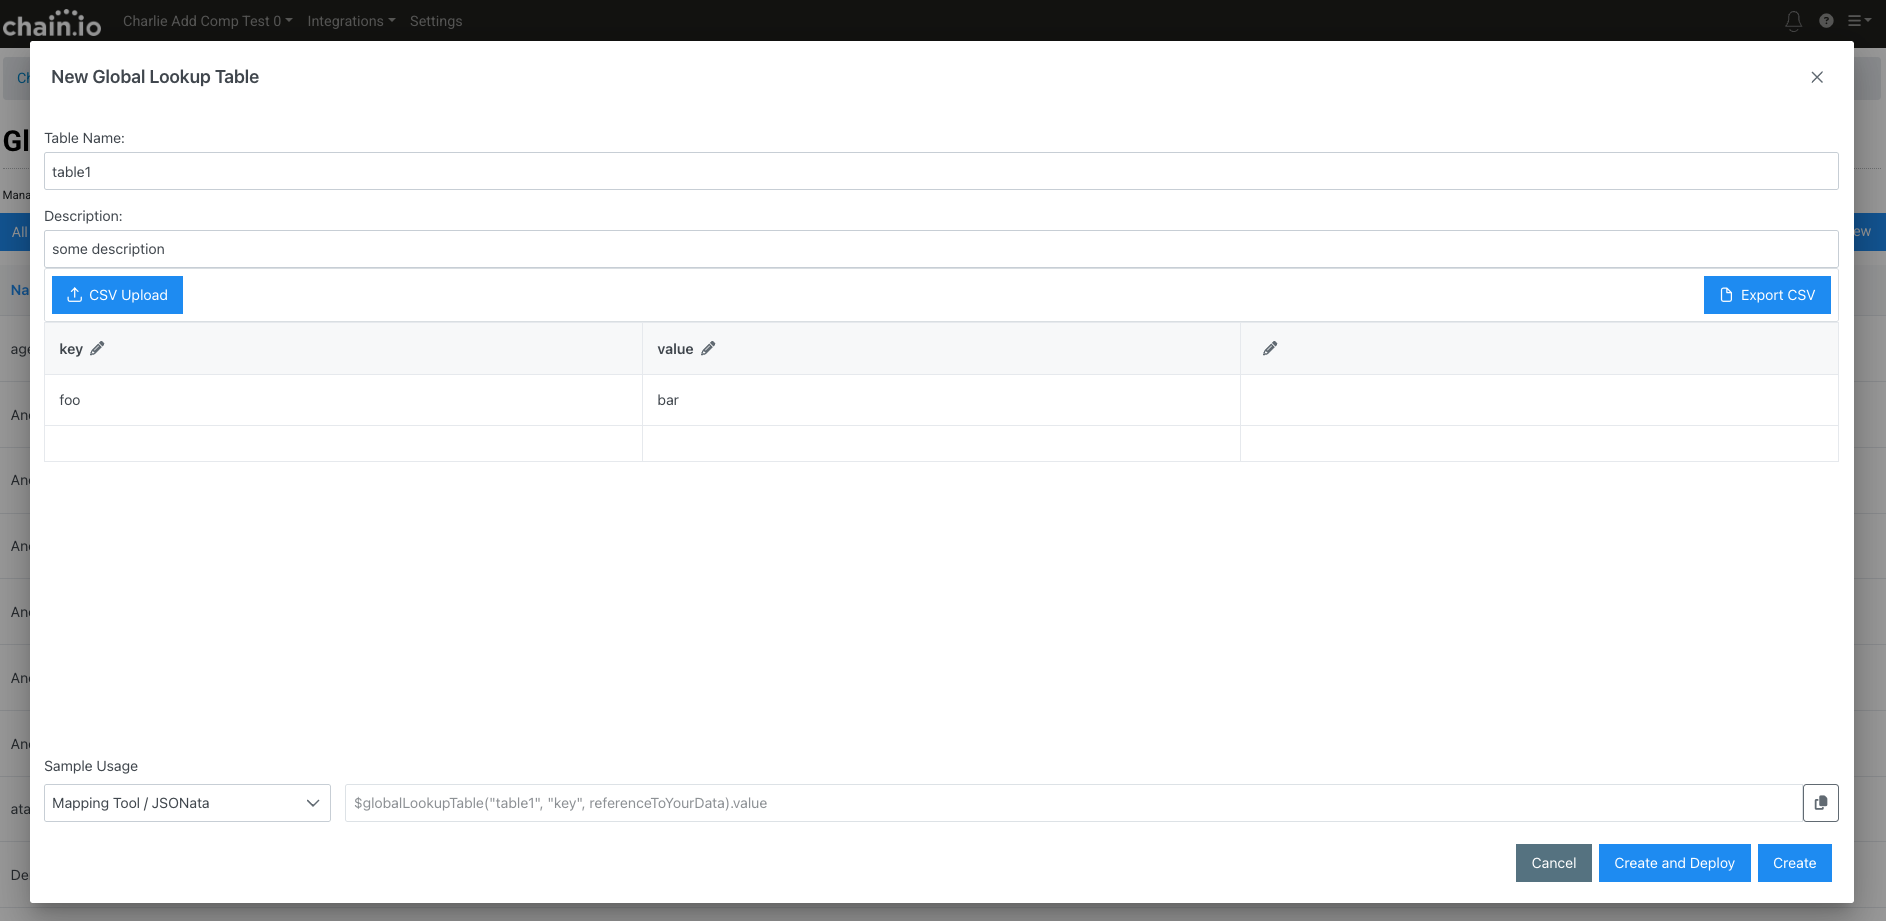
Click the blue “New” button in the upper right corner to create a new Global Lookup table. The New Global Lookup Table pop-up window appears.
- Specify a table name.
-
Provide a table description.
-
Choose a method below to populate the table.
The possible combination methods are:- Upload a CSV To upload a CSV file with input and output values for the table, click the blue CSV Upload button.
- Manually enter data into the table
Customization Options:-
Edit Column Headers
Click the pencil icon next to the words key and value to edit the column names. -
Edit Data
If you choose to upload a CSV file, you can manually edit the data in the table. -
Export Data
You can also click the blue Export CSV button in the upper left region of the pop-up window to export the data from the table to a CSV file.
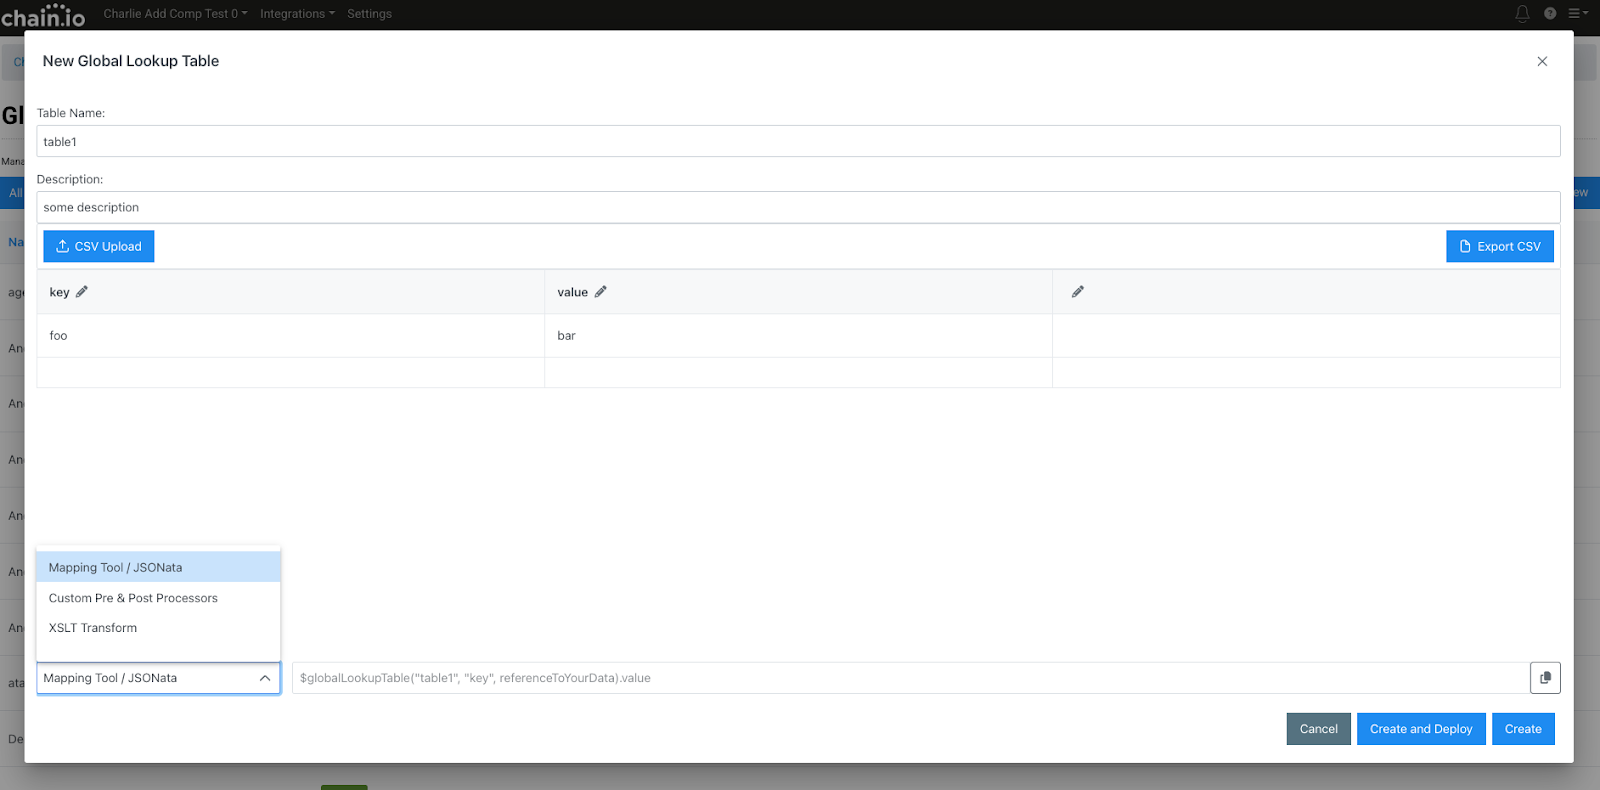
- Navigate to the bottom of the pop-up window to address the Sample Usage section. In this section, you can select where you intend to utilize the Global Lookup table.

-
Click the drop-down menu and select from the following options:
- Mapping Tool / JSONata
- Custom Pre & Post Processors
- XSLT Transform
-
Copy and paste the sample usage formula to use for configuring a custom mapping, pre- and post-processors, and XSLT transforms.
Examples of the Sample Usage Formulas:
-
Mapping Tool / JSONata

-
Pre & Post Processors

- XSLT Transforms
-

-
In the bottom right corner of the pop-up window, click the blue Create button to save the information in the table. Click the blue Create and Deploy button to make the table available for use in Flows.
You can now use the Global Lookup table in custom mappings, custom processors (pre-processors and post-processors), and XSLT transforms.
For more information on the structure of Global Lookup tables, refer to the Other Functions support article.
Using a Global Lookup Table in the Custom Mapping Tool
Utilize Global Lookup tables to expand the Custom Mapping tool functionality and simplify the mapping process when converting values.
Within the Custom Mapping tool, you can achieve the following:
- View the values corresponding to a specific Global Lookup table that you created.
-
View the functions corresponding to all of the Global Lookup tables that you created.
Follow the steps below to employ a Global Lookup table within the Chain.io Custom Mapping tool:
- At the top menu bar, click Workspaces and select the desired Workspace.
- At the top right of the screen, click Workspace Settings from the hamburger menu.
- Navigate to the Developer Center subsection.
- Select Custom Mapping Tool.Use the Custom Mapping tool to create, edit, and manage your data mappings and Global Lookup tables. If you have an existing mapping, it will appear in the table on the Workspace Maps page.Click edit on the row of an existing mapping to edit it in the Custom Mapping tool or create a new mapping.
For more information on creating a new mapping, refer to the Custom Mapping Tool support article. The Custom Mapping tool displays three columns:
- Input (1st/left column) - Input your source data in this column either by uploading a file or copying and pasting your data directly into the column. Accepted formats are JSON, XML, CSV, or EDI.
-
JSONata Expression (2nd/middle column) - Your JSONata transformation logic template will appear automatically in this column after you select an output file type in the third panel on the right. Write your JSONata expressions for mapping your data in this column.
Refer to our Guide to JSONata Mapping Expressions for more information on how to craft JSONata expressions.You can also edit a JSONata expression for a custom mapping and embed a Global Lookup table reference to convert data in files during the Flow execution process.
When the JSONata Expression panel is blank, you can write functions to query your Global Lookup tables in this panel.
-
Output (3rd/right column) - The results of your mapping and adjustments to your JSONata expression will appear in this column in real-time.The output from your Global Lookup tables query will display in the Output panel.
Viewing Global Lookup Tables in the Custom Mapping Tool
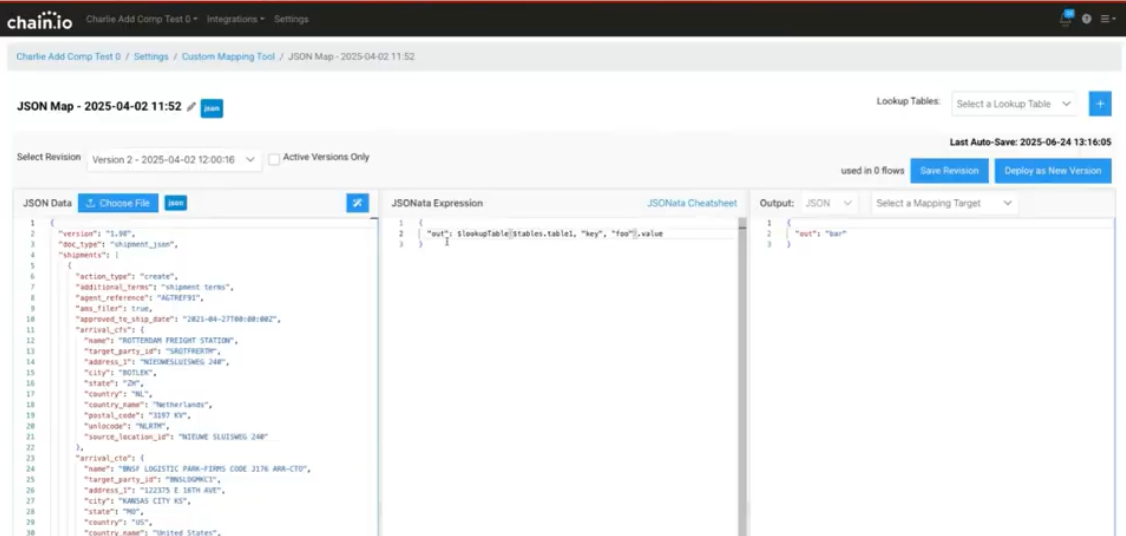
The examples in this section use a Global Lookup table called “table1,” where the input key is “foo” and the output value is “bar.”

You can use the Global lookup table in your mapping expressions using the function $lookupTable.
To view a single value conversion from a Global Lookup table within the Custom Mapping Tool, enter the following code in the JSONata Expression panel:
{
  "out": $lookupTable($tables.table1. "key", "foo").value
}
The Output panel will display "bar," the adjusted value for the input key “foo”.
{
  "out": "bar"
}
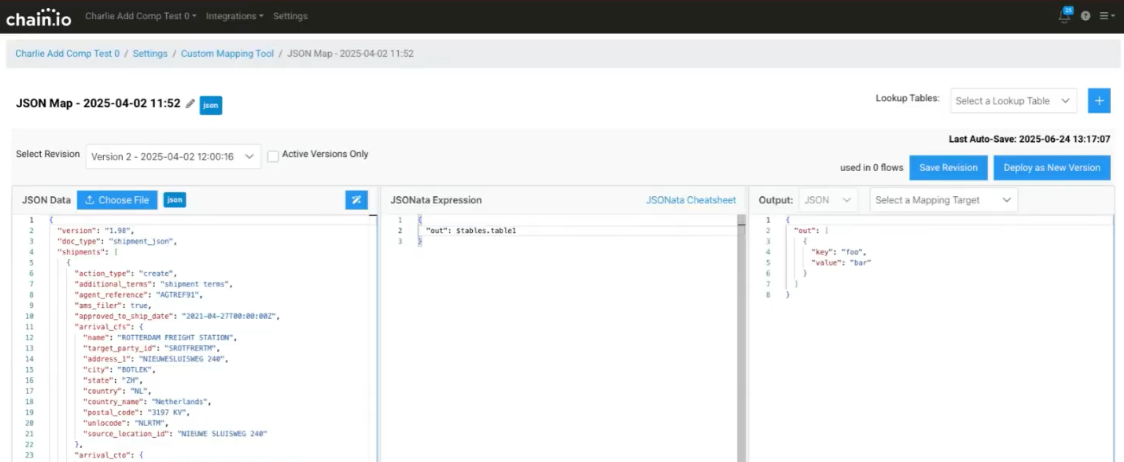
To view the contents of a single Global Lookup table within the Custom Mapping Tool, enter the following code in the JSONata Expression panel:
{
  "out": $tables.table1
}
The Output panel will display all of the values for the Global Lookup table called "table1."
{
  "out":  [
    {
      "key":  "foo"
      "value": "bar"
    }
  ]
}
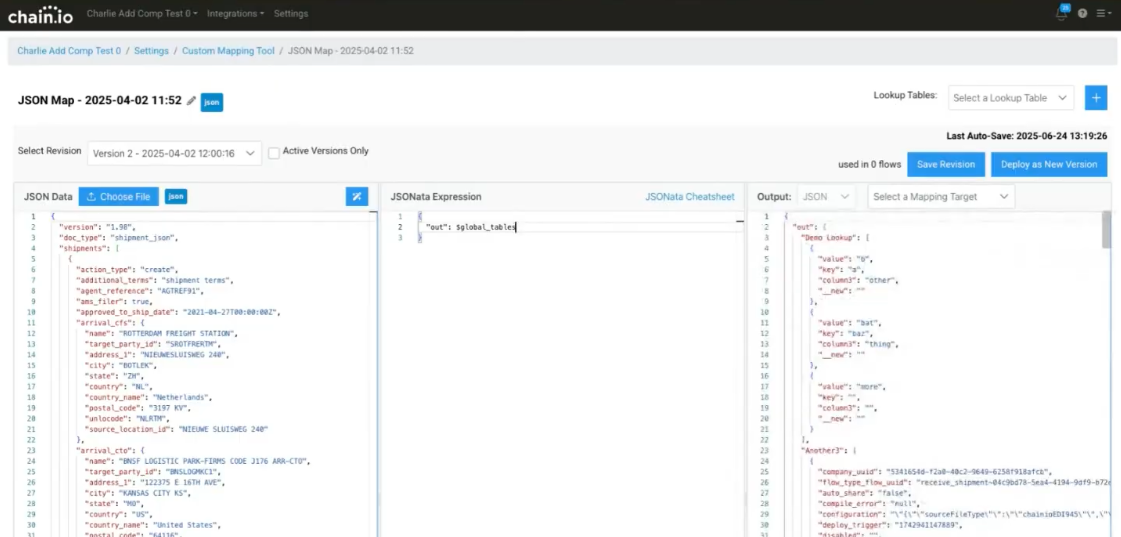
To view the contents of all of the created Global Lookup tables within the Custom Mapping Tool, enter the following code in the JSONata Expression panel:
{
  "out": $global_tables
}
The Output panel will display the contents of all of the Global Lookup tables.
- Select the appropriate output file type and mapping target from the Output panel.
- Edit the JSONata expression in the JSONata Expression panel to configure your custom mapping and reference your Global Lookup table in the expression as needed.
- In the upper right corner of the page, click the blue Save Revision button.
-
In the same area, click the blue Deploy as New Version button to make the Lookup table available for use in Flows.
Using a Global Lookup Table in Custom Processors
You can use Global Lookup tables in custom processors to convert data within files at the start or end of a Flow execution process.
Follow the steps below to employ a Global Lookup table within pre-processors and post-processors:
- At the top menu bar, click Integrations and select the desired Integration.
- At the top right of the screen, click Integration Settings from the hamburger menu.
- On the Integration Settings page, existing Flows will appear within the table. To edit an existing Flow, click Edit on the right of the Flow’s row. To create a new Flow, scroll to the bottom of the table and click the blue Add New Flow button.For more information on how to create a Flow, refer to our Creating a Basic Flow support article.
- Scroll down to the Custom Processors & Mappings subsection.
- Add the appropriate code for employing a pre-processor or post-processor. Include the reference to the Global Lookup tables in this section.
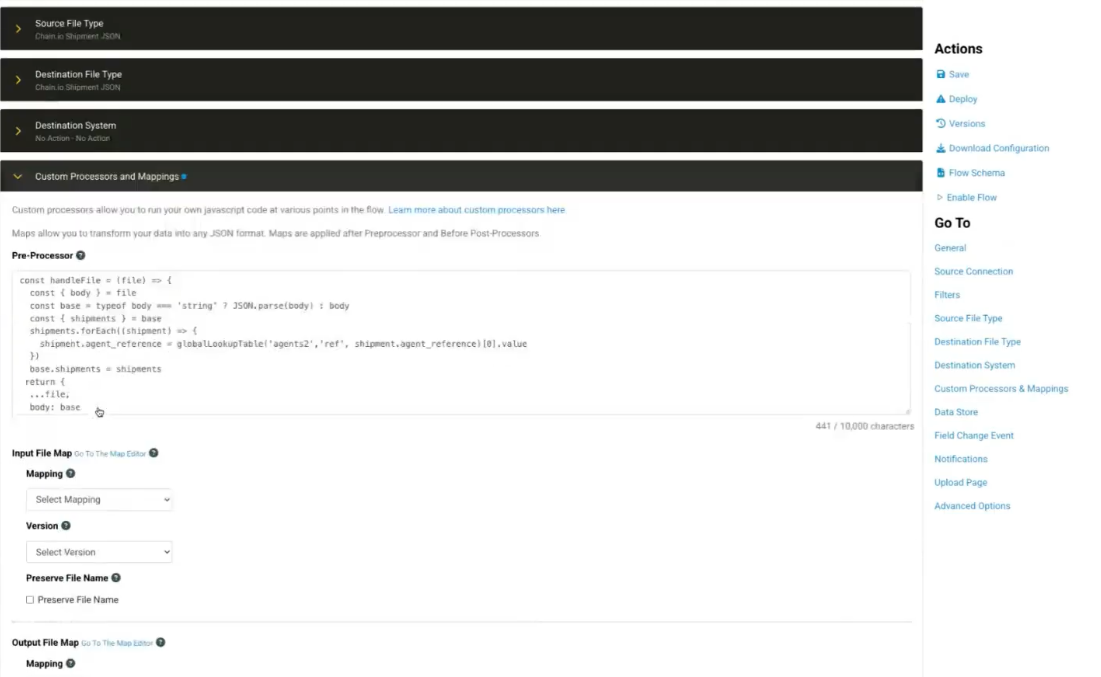
- Within the Actions menu on the right side of the page, click Save to save your Flow configuration settings.
-
Within the same menu, click Deploy to implement the configuration.
For more information on pre-processors and post-processors, refer to the Custom Processors support article.
Was this article helpful?
That’s Great!
Thank you for your feedback
Sorry! We couldn't be helpful
Thank you for your feedback
Feedback sent
We appreciate your effort and will try to fix the article