The Chain.io SFTP Server is designed for temporary storage while exchanging files with your trading partner. All files are purged 30 days after creation. Do not use it as a long-term file storage solution.
Overview
Your Chain.io account comes with a Secure FTP (SFTP) server to facilitate secure file exchanges with trading partners. While we encourage the use of HTTPs endpoints whenever possible due to their efficiency and scalability, we understand that some systems may not support HTTPs integrations. For users without access to their own SFTP server, Chain.io offers a free SFTP hosting service to meet your data transfer needs.
This article explains how to set up and manage your complimentary SFTP server, providing a secure alternative when HTTPs isn't an option.
Why Use HTTPs Endpoints?
Before diving into SFTP, it's important to highlight the advantages of using HTTPs for data exchange. HTTPs endpoints are easier to manage, offer faster data transfers, and are scalable for large data volumes. They also provide more flexibility for modern system integrations. We strongly recommend using HTTPs when available, but if that’s not feasible, this SFTP service is here to support you.
Chain.io Complimentary SFTP Service
If you or your trading partners need to use SFTP, Chain.io provides a shared SFTP environment that allows secure file exchanges. Users and their trading partners can create SFTP accounts that connect to the Chain.io SFTP server.
To take advantage of this service, you will need to navigate to Workspace Settings>SFTP Users to begin.
We recommend that the first SFTP user account that you create is a Workspace Admin account so that it can be used to help manage and maintain the SFTP folder directories. From there you can create other SFTP users that can be given to your trading partners and customers to take advantage of.
Creating an SFTP User
Under Workspace Settings>SFTP Users click the “Add User” button, they will then need to fill out the following information:
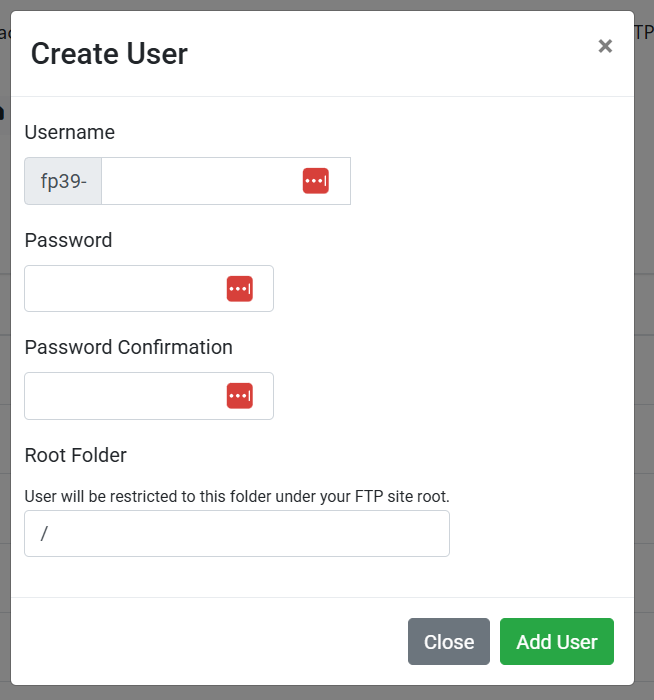
- Username: The username required to log in to the SFTP server.
- Password and Password Confirmation: The password associated with the username to authenticate the connection.
- Root Folder: This restricts the user account to only have access to the folder listed here. If the root folder is “/”, then that account will have access to all folders under the site root.
SFTP Connection Details
To connect to your complimentary SFTP site, you'll need to use the following credentials in any SFTP client such as FileZilla or Cyberduck:
- Protocol: SFTP
- Server Address: transfer.chain.io
- Port: 22 (default for SFTP)
- Username and Password: These are specific to each account you create in the Chain.io portal.
Folder Structure and Permissions
All SFTP accounts created on Chain.io share the same base folder on the server, allowing for flexible file organization and permission settings. You can create subfolders for different trading partners and restrict their access to only those folders, ensuring secure and compartmentalized data exchanges.
Root Folder Configuration within Portal
To restrict access for different users, you can set the Root Folder option when creating or editing an account in Chain.io:
- Master Account: Set the root folder to / so that the master account has access to all subfolders.
- Trading Partner Accounts: Assign root folders like /A-integration-partner and /b-integration-partner to restrict access to specific directories, ensuring that each trading partner only sees their own data.
Example Folder Structure:
Let's say you have two trading partners, "A Integration Partner" and "B Integration Partner." You can set up your SFTP site so that:
- The master account for your company has access to the entire root directory (/), where it can view and manage all integration partner folders.
- Each integration partner account (e.g., "A Integration Partner" and "B Integration Partner") can be restricted to its respective folder for secure and private access.
Here’s how the folder structure could look:
Master Account View:
/
/A-Integration-Partner
- sample_file.xml
/B-Integration-Partner
- other_file.xml
"A Integration Partner" Account View:
/
- sample_file.xml
Creating the actual folders in the SFTP:
So at this point we have defined in the portal what access restrictions each SFTP User account will have, so lastly we need to create the actual folders in the SFTP site.
You will need to log into an SFTP client such as FileZilla, Cyberduck, etc. with the Admin/Master SFTP user account you created that has root access. Once you are logged into the server you can add new folders/directories under the SFTP (the method of doing this can vary by client) to match what you defined for the other SFTP user accounts.
Once you have finished creating your folders/directories, you are good to begin using your new SFTP connection details with your flows. To learn more about how to set up flows using SFTP please view the following.
Was this article helpful?
That’s Great!
Thank you for your feedback
Sorry! We couldn't be helpful
Thank you for your feedback
Feedback sent
We appreciate your effort and will try to fix the article